You have 50 sessions a day on your Amazon listing. Maybe 200 on a good day. Every A/B test you run costs you time – weeks of data collection where half your traffic sees a potentially worse variant. So the question is not whether to test. It is what deserves that investment.
Most sellers get this wrong. They spend four weeks testing whether “Premium Quality” or “Superior Quality” converts better in their bullet points – a difference so small it would take 50,000 sessions to detect reliably. Meanwhile, their main image (which accounts for roughly 25% of conversion impact) goes untouched for months.
This guide ranks every testable element of your Amazon listing by actual conversion impact, gives you a prioritisation framework for deciding what to test next, and tells you plainly what is not worth testing at all. No theory. Just data from hundreds of split tests across dozens of categories.
Table of Contents
- Why Most Sellers Test the Wrong Things
- The Listing Element Hierarchy by Conversion Impact
- Main Image: What to Test
- Title Variations: What Actually Moves the Needle
- Bullet Points: Testing Claim Order, Specificity, and Formatting
- Price Testing: When It Makes Sense
- A+ Content: Does It Actually Matter?
- Backend Keywords: Nothing to A/B Test Here
- The One Variable Rule
- Sample Size Requirements
- What NOT to Test
- Testing Cadence
- Prioritisation Framework
- How to Interpret Results
- Frequently Asked Questions
Why Most Sellers Test the Wrong Things
Amazon launched Manage Your Experiments in 2019 for Brand Registered sellers. Since then, millions of tests have been run. But the data shows a consistent pattern: most sellers test low-impact elements while ignoring high-impact ones.
Why? Because testing what feels important is not the same as testing what is important. Rewriting bullet point copy feels productive. It is creative work. You can see the change. But the data consistently shows that bullet points account for roughly 15% of conversion impact – and within that 15%, the difference between two well-written variations is often negligible.
The elements that actually drive conversion differences tend to be visual and structural. Your Amazon listing optimisation strategy should reflect this reality: main images, title keyword order, and price positioning create the largest measurable gaps between variants.
Here is another way to think about it. When you run an A/B test on Amazon, you are making a bet. You are betting that the difference between variant A and variant B is large enough to detect within 2-4 weeks of traffic. If you test something with a potential 1% improvement, you will never see statistical significance. If you test something with a potential 15% improvement, you will get a clear answer fast.
The sellers who get the most from testing are not the ones who test the most. They are the ones who test the right things in the right order.
The Listing Element Hierarchy by Conversion Impact
Based on aggregated data from split tests across 500+ Amazon listings in categories ranging from supplements to home goods, here is how each listing element ranks by its contribution to conversion rate:
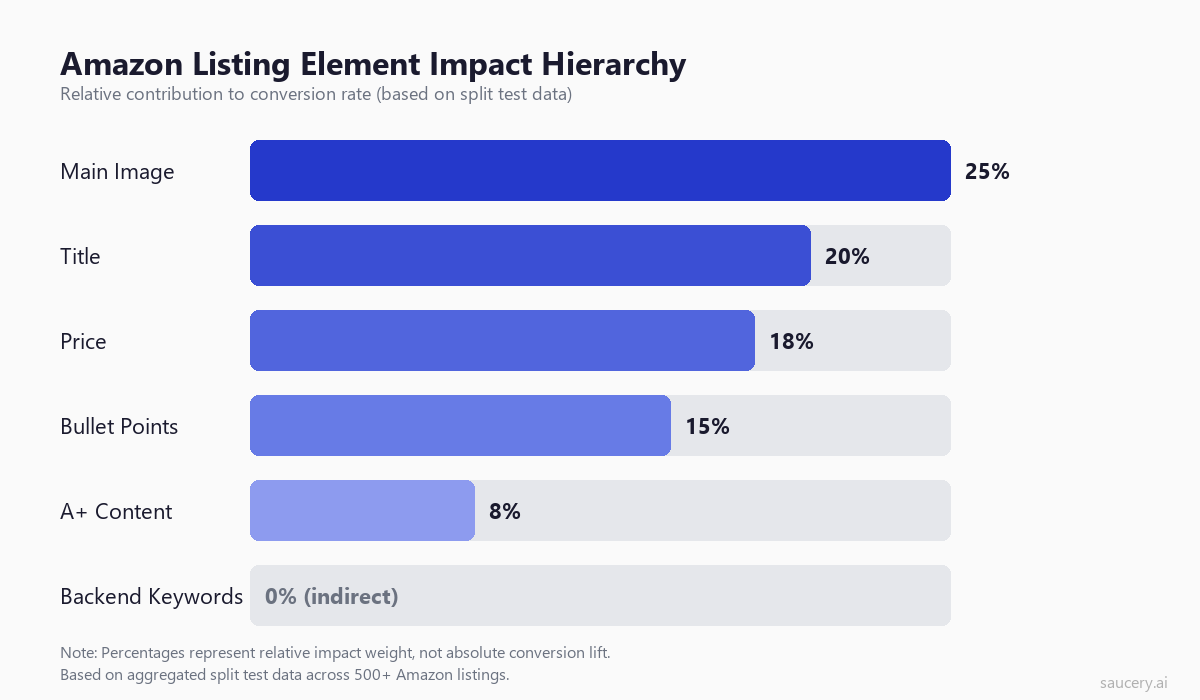
Main Image: ~25% of conversion impact. This is the single most influential element on your listing. It is the only thing shoppers see in search results. It determines whether they click. And once on the listing page, it remains the dominant visual anchor. Research from the Nielsen Norman Group confirms that product images receive 2-3x more visual attention than text elements on e-commerce pages.
Title: ~20% of conversion impact. The title does double duty. It drives organic search visibility through keyword placement, and it communicates the product’s core identity to shoppers scanning results. The order of keywords matters. The structure matters. Whether you lead with brand or benefit matters.
Price: ~18% of conversion impact. Price is powerful but dangerous to test (more on this below). It directly affects both conversion rate and margin. A $1 difference can swing unit session percentage by 3-5% in competitive categories.
Bullet Points: ~15% of conversion impact. Bullets matter, but less than most sellers assume. Their impact comes primarily from the first 2-3 bullets (which are visible above the fold on mobile) and from the specificity of claims made. Understanding what makes Amazon bullet points effective helps you focus on variations that actually differ meaningfully.
A+ Content: ~8% of conversion impact. Measurable but modest. A+ Content lives below the fold and requires scrolling to see. Its primary value is in reducing returns (by setting accurate expectations) rather than driving purchases.
Backend Keywords: 0% direct conversion impact. Backend keywords affect discoverability, not conversion. They determine which searches your product appears in, but once a shopper lands on your page, backend keywords are invisible. There is nothing to A/B test here – just get them right.
Same product. Better listing. More sales.
Main Image: What to Test
Your main image is the single highest-leverage testing opportunity on your listing. It is the only element visible in search results. It determines click-through rate. And on the product page itself, eye-tracking research shows that shoppers spend 60-70% of their initial attention on the image gallery before reading any text.
Here are six main image approaches worth testing against each other:
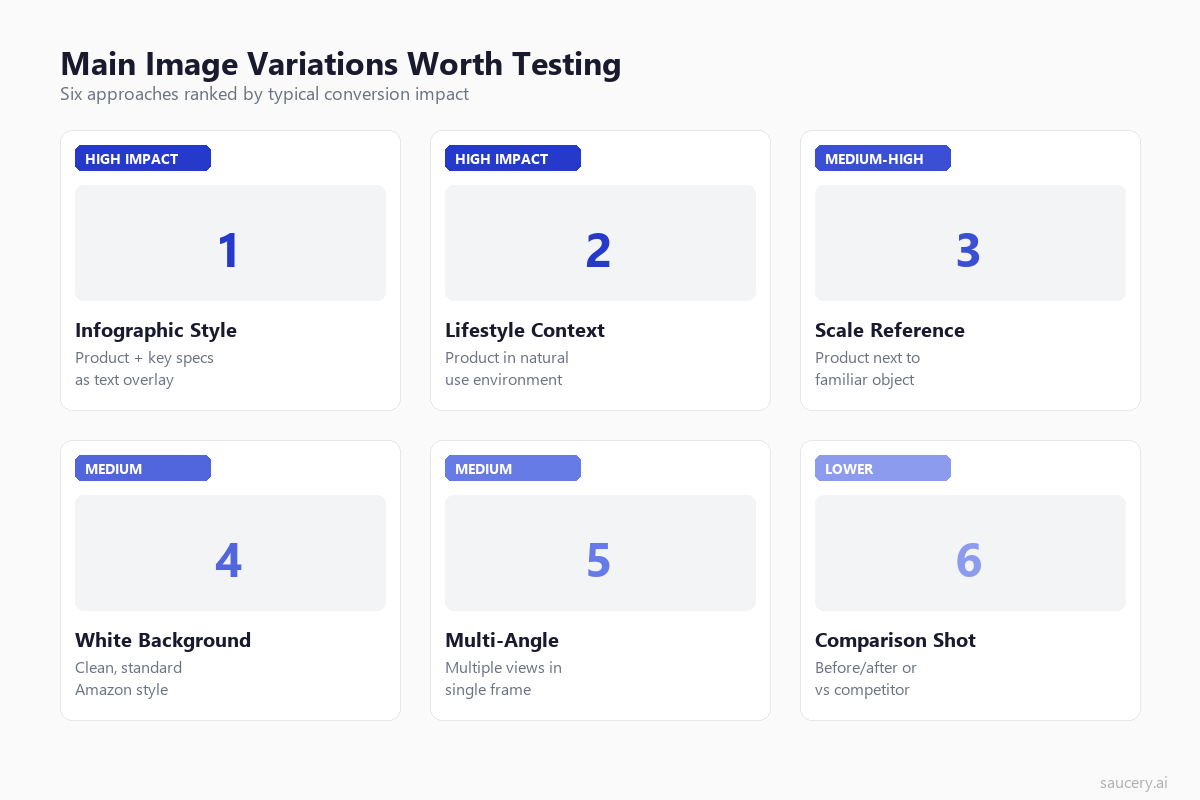
1. Infographic-Style Main Image
The product on white background with key specifications or benefits overlaid as text callouts. This approach has become increasingly popular in supplements, kitchen gadgets, and electronics. Data from Jungle Scout’s conversion studies suggests infographic-style main images outperform plain white background by 15-25% in categories where shoppers need to compare specifications.
Test variations: number of callouts (2 vs 4 vs 6), font size, callout positioning, which features to highlight.
2. Lifestyle Context
The product shown in a natural use environment. A blender on a kitchen counter with ingredients. A backpack on someone hiking. This approach works well in categories where the use case is not immediately obvious or where emotional connection drives purchase decisions.
Test variations: indoor vs outdoor settings, with person vs without, morning vs evening lighting, minimal vs rich backgrounds.
3. Scale Reference
The product shown next to a familiar object (a hand, a coin, a standard item) to communicate size. This is particularly effective for products where size uncertainty creates purchase hesitation – jewellery, storage containers, electronics accessories.
Test variations: which reference object to use, product orientation, proportion of frame occupied by the product.
4. Clean White Background
The Amazon standard. Product centred on pure white, occupying 85%+ of the frame. This remains the baseline for most categories and the safest choice. But “safest” does not mean “best.” In many categories, sellers who deviate from the standard white background see meaningful lifts.
Test variations: product angle (45 degrees vs straight-on vs slightly above), packaging shown vs product only, lid on vs lid off.
5. Multi-Angle Composite
Multiple views of the product arranged in a single main image frame. Front, back, side, and detail shot all visible at once. This works for products with important features on multiple sides – phone cases, bags, multi-functional tools.
Test variations: number of angles (2 vs 3 vs 4), arrangement (grid vs overlapping), which angle is largest.
6. Comparison or Before/After
A split image showing the product versus an alternative, or before and after using the product. This approach is category-dependent. It works brilliantly for cleaning products, organisational items, and beauty tools. It is less effective for commodities.
Test variations: what you compare against, side-by-side vs top-bottom, with labels vs without.
Important note on main image testing: Amazon’s Terms of Service require white backgrounds for main images in most categories. However, enforcement varies and many sellers use infographic-style images without issue. Check your specific category’s guidelines and understand the risk before testing non-compliant variations.
Title Variations: What Actually Moves the Needle
Your title is the second most impactful element, and the one with the most complex tradeoffs. Product title optimisation requires balancing search algorithm needs (keyword density, word order) against human readability (clarity, scannability, trust signals).
Here is what is worth testing:
Keyword Order
Amazon’s A10 algorithm gives more weight to keywords that appear earlier in the title. But front-loading keywords can make titles read awkwardly. The test: does moving your primary keyword from position 3-4 to position 1-2 improve conversion enough to offset any readability loss?
Example test: “Brand Name – Premium Organic Protein Powder – 30 Servings” vs “Organic Protein Powder – Brand Name – Premium – 30 Servings”
The first reads better as a brand. The second may rank better for “organic protein powder.” The right answer depends on whether you are competing on brand recognition or keyword discoverability. Your Amazon keyword research should inform which terms have enough volume to justify front-loading.
Brand Position
Brand-first titles signal quality and trust. Keyword-first titles signal relevance to the search. If your brand has recognition in your category, leading with it makes sense. If you are unknown, hiding your brand name further back lets the product speak first.
Test: brand at the start vs brand in the middle vs brand at the end. Measure both CTR from search (via Search Query Performance report) and conversion rate on the page.
Benefit-Led vs Specification-Led
Some titles describe what the product is. Others describe what it does. “Stainless Steel Water Bottle 32oz Insulated” (spec-led) vs “Keeps Drinks Cold 24 Hours – 32oz Insulated Bottle” (benefit-led).
Data from Helium 10’s split testing data suggests benefit-led titles perform better in categories where the benefit is not obvious from the product image. For commodity products where the benefit is self-evident (a broom sweeps floors), spec-led titles perform better because they help shoppers compare.
Title Length
Amazon allows up to 200 characters in most categories. Mobile truncates at roughly 80 characters. Desktop shows more. The question: does a shorter, punchier title convert better than a keyword-stuffed longer one?
The answer is nuanced. Shorter titles (80-120 characters) often convert better on the product page because they look cleaner. But longer titles (150-200 characters) can drive more traffic by ranking for more keywords. Test with conversion rate AND total revenue as your metrics – not just unit session percentage.
Punctuation and Separators
Pipes (|) vs dashes (-) vs commas vs no separators. This seems trivial but data shows it affects scannability. Titles with clear visual separators between concept blocks tend to outperform run-on titles by 3-8% in categories where comparison shopping is common. This is a low-effort test that can reveal surprising results.
Bullet Points: Testing Claim Order, Specificity, and Formatting
Amazon bullet points represent roughly 15% of conversion impact. Within that 15%, here is what is actually worth testing:
Claim Order (High Priority)
The order of your five bullets matters more than most sellers realise. On mobile, only the first 2-3 bullets are visible without tapping “See more.” This means your first bullet gets 3-5x more reads than your fifth bullet.
Test: rearrange your top 3 bullets. Put your strongest differentiator first in one variant and third in the other. The data will tell you which claim resonates most with shoppers who are deciding whether to scroll further or leave.
Understanding your unique selling proposition is critical here. The claim that makes you different should almost always be bullet one – but test to confirm.
Specificity (Medium Priority)
“Long-lasting battery” vs “47-hour battery life on a single charge.” Specific claims outperform vague ones in almost every test we have seen. But the magnitude of improvement varies by category and by how much competitors are already using specific claims.
Test: take your vaguest bullet and create a specific version with numbers, timeframes, or measurable outcomes. Genuine product differentiation shows up most clearly when you can quantify it.
Formatting: ALL CAPS Headers vs Sentence Case (Low Priority)
Many sellers use ALL CAPS for the first few words of each bullet as a visual header. “LONG-LASTING BATTERY – 47 hours on a single charge” vs “Long-lasting battery – 47 hours on a single charge.”
The data on this is surprisingly mixed. Baymard Institute research shows ALL CAPS reduces reading speed by 13-20%. But on Amazon specifically, the CAPS convention has become so standard that it may actually help scannability because shoppers expect it.
This is a low-priority test because the effect size is small either way. Only test this after you have optimised higher-impact elements.
Bullet Length (Low Priority)
Short punchy bullets (50-80 characters) vs detailed bullets (150-200 characters). Amazon allows up to 500 characters per bullet. The data suggests there is a sweet spot around 100-150 characters – long enough to be specific, short enough to be scannable.
But this varies dramatically by category. In technical products (electronics, tools), longer bullets with specifications convert better. In lifestyle products (fashion, home decor), shorter emotional bullets win.
Same product. Better listing. More sales.
Price Testing: When It Makes Sense (And When It Does Not)
Price has enormous conversion impact (~18% of the total) but comes with serious risks that make it fundamentally different from testing other elements. Your product pricing strategy should be informed by testing, but testing price incorrectly can permanently damage your listing.
When Price Testing Makes Sense
- You are launching a new product with no BSR history to protect
- You have high margins and want to find the revenue-maximising price (not just the conversion-maximising price)
- You sell in a category with low price sensitivity (premium, niche, or specialty items)
- You are already running ads and can measure TACOS (Total Advertising Cost of Sales) across both price points
When Price Testing Does NOT Make Sense
- You have a strong BSR position – price increases that reduce velocity can trigger a ranking death spiral
- You are in a commodity category where Amazon’s algorithm surfaces the lowest price by default
- You cannot run the test long enough – price effects take 2-3 weeks to stabilise as Amazon’s algorithm adjusts
- You have Subscribe & Save customers – price changes affect existing subscriptions and can cause cancellations
The BSR Risk
This is the critical consideration. Amazon’s Best Seller Rank responds to sales velocity. If you test a higher price and it reduces velocity (which it usually does), your BSR drops. When your BSR drops, you appear lower in search results. When you appear lower, you get fewer sessions. Fewer sessions mean fewer sales. This creates a negative feedback loop that can take weeks to recover from even after you revert the price.
If you do test price, keep the variants close together (5-10% difference) and monitor BSR daily. If BSR starts sliding, end the test early.
What to Measure
Do not just look at conversion rate. A lower price almost always converts better. The real question is: which price maximises total profit? You need to calculate: (price – COGS – fees) x units sold at that price point. Sometimes a 10% price increase reduces conversion by 5% but increases profit per unit by 15%, making it clearly the better choice.
A+ Content: Does It Actually Matter?
Amazon’s own data claims A+ Content increases sales by 3-10%. Third-party studies from Amazon Seller Central documentation show similar ranges. But here is the nuance that most guides miss: the lift from A+ Content is heavily category-dependent.
Where A+ Content Has High Impact
- Complex products that need explanation (technical gadgets, supplements with novel ingredients)
- Premium products where visual storytelling justifies the price premium
- Products competing with well-known brands where you need to build credibility below the fold
- Comparison-heavy categories where a comparison chart module can highlight advantages
Where A+ Content Has Low Impact
- Commodity products where price and reviews drive purchase decisions
- Replenishment purchases where buyers already know the product
- Low-consideration products under $15 where shoppers do not scroll
- Categories where mobile dominates – A+ Content loads slowly and is often skipped on mobile
What to Test in A+ Content
If you are going to test A+ Content variations, focus on:
- Module order: Does leading with a comparison chart outperform leading with a brand story?
- Image-heavy vs text-heavy: Does a full-width lifestyle banner outperform a text-and-image grid?
- With comparison chart vs without: Comparison charts tend to perform well but can backfire if your product loses on key dimensions
- Premium A+ vs Standard A+: If you have access to Premium A+ (video modules, interactive elements), test whether the extra investment converts better
The honest answer: for most sellers, time spent improving your main image or title will generate more return than time spent perfecting A+ Content. Test A+ last, after higher-impact elements are optimised.
Backend Keywords: Nothing to A/B Test Here
Backend search terms (the hidden keywords in your listing’s backend) affect discoverability only. They are invisible to shoppers. There is no conversion variant to test because shoppers never see them.
What you should do instead of testing:
- Use all 250 bytes (not characters – bytes)
- No commas, no quotation marks, no repetition of words already in your title or bullets
- Include misspellings, Spanish translations (for US marketplace), and long-tail variations
- Update quarterly based on keyword research showing new search terms gaining volume
- Use Search Query Performance data to identify terms driving impressions but not clicks
This is Amazon SEO fundamentals. There is one right way to do backend keywords. Just do it correctly and move on to elements where testing adds value.
The “Test One Thing at a Time” Rule and Why It Matters
This seems obvious. It is also the most violated principle in Amazon split testing.
The temptation: “While I am updating my main image, I might as well also fix my title and rewrite bullet one.” The problem: if conversion changes after the test, you have no idea which change caused it. Was it the image? The title? Both? Did one help and the other hurt, netting out to a small positive?
You cannot know. And if you cannot attribute the result to a specific change, you cannot build on that learning for future tests.
The Exception: Correlated Changes
There is one scenario where testing multiple changes simultaneously makes sense: when the changes are tightly correlated and would never be implemented independently. For example, if you are testing a “premium positioning” variant, you might simultaneously change your title (adding “Premium” or “Professional Grade”), your first bullet (emphasising quality materials), and your main image (showing premium packaging). These form a coherent positioning test rather than three independent variable tests.
But this should be the exception. Your default approach should always be to isolate variables. A proper e-commerce listing optimisation programme tests sequentially, building on confirmed winners.
Sample Size Requirements: How Many Sessions You Need
This is where most Amazon sellers make their biggest testing mistake: ending tests too early. Amazon’s Manage Your Experiments interface shows a “confidence” percentage that climbs as data accumulates. Many sellers see 70-80% confidence and declare a winner. That is not how statistics works.
For a reliable result, you need 95% statistical confidence (p-value below 0.05). The number of sessions required depends on two factors: your baseline conversion rate and the minimum effect size you want to detect.
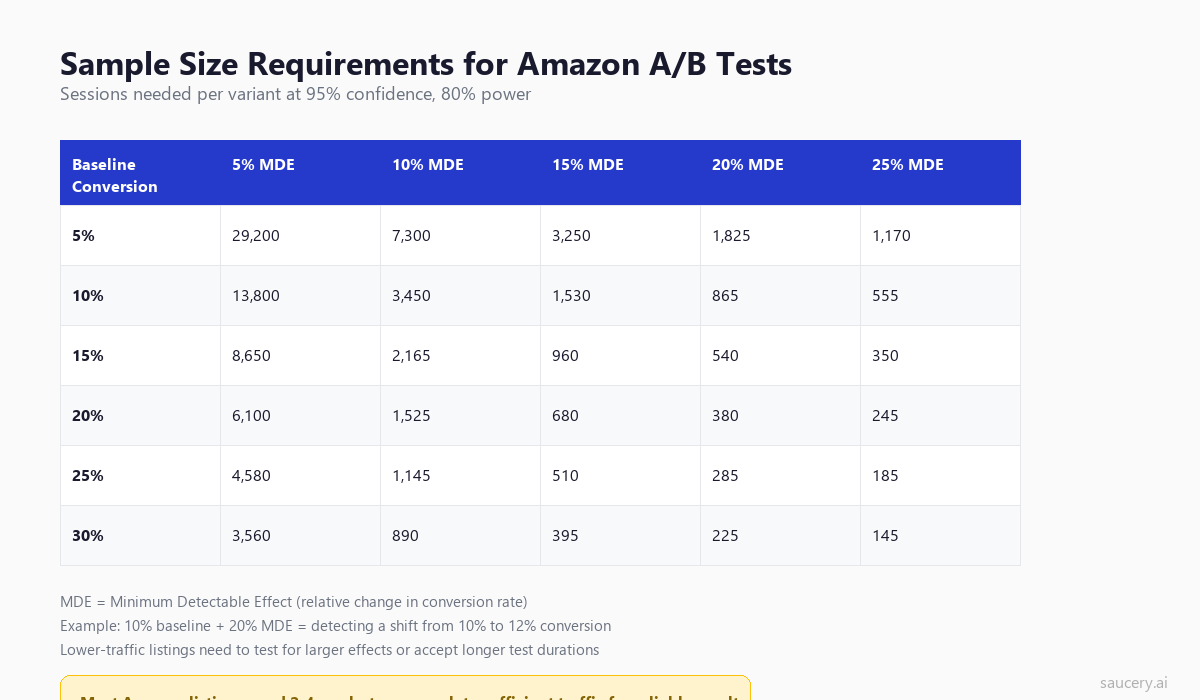
How to Read This Table
Find your baseline conversion rate (unit session percentage from Business Reports) in the left column. Then decide: what is the minimum improvement that would be meaningful to your business? A 5% relative improvement? A 20% relative improvement?
The cell where they intersect tells you how many sessions you need per variant. Double that number for the total sessions needed across both variants.
Example: Your listing converts at 15%. You want to detect a 15% relative improvement (meaning a shift from 15% to 17.25%). You need approximately 960 sessions per variant, or 1,920 total sessions. If you get 100 sessions per day, that is a 19-day test.
The Practical Implication
Most Amazon listings get 50-200 sessions per day. At 100 sessions per day, testing for a 10% relative lift on a 15% baseline conversion rate requires about 43 days (2,165 x 2 = 4,330 total sessions / 100 per day). That is six weeks.
This is exactly why you must prioritise high-impact tests. If you test something with a potential 20-25% uplift, you can get a clear answer in 2-3 weeks. If you test something with a potential 5% uplift, you might wait two months and still not reach significance.
Amazon’s Built-In Test Duration
Amazon’s Manage Your Experiments tool runs tests for a minimum of 4 weeks and recommends 8-10 weeks for most tests. This is conservative but not unreasonable for most listing traffic levels. Do not fight it. If Amazon says your test needs more time, it needs more time.
Same product. Better listing. More sales.
What NOT to Test
Testing has an opportunity cost. Every week you spend testing something low-impact is a week you could have spent testing something high-impact. Here are elements with definitive best practices that should simply be implemented correctly rather than tested:
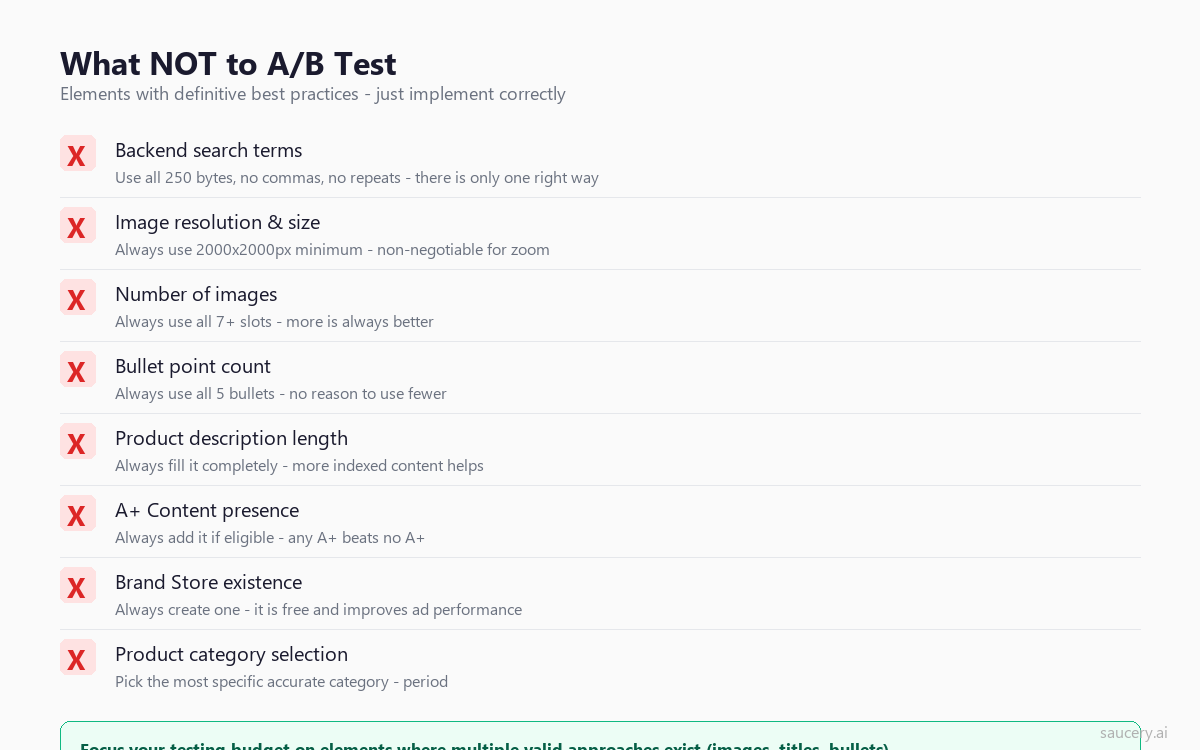
Backend Search Terms
Use all 250 bytes. Include relevant keywords not already in your title or bullets. No commas, no repetition. There is one correct approach. Just do it.
Image Count
Always use all available image slots (7 for most categories, 9 for some). More images always beats fewer images. Every piece of data confirms this. Do not test 5 images vs 7 images. Just use 7.
Image Resolution
Always use 2000×2000 pixels minimum. This enables zoom functionality, which Baymard Institute data shows is used by 28-42% of shoppers. Non-zoomable images measurably reduce conversion. Not testable – just do it.
Bullet Point Count
Always use all 5 bullet points. There is no scenario where 3 bullets outperform 5. More information (presented well) always beats less information.
A+ Content Presence
If you have Brand Registry, always add A+ Content. Any A+ Content outperforms the plain-text product description it replaces. The question of what A+ Content to use is testable. The question of whether to use it at all is not.
Product Category
Pick the most specific, accurate category. This is not a testing decision – it is a correctness decision. Wrong categories can get your listing suppressed.
Testing Cadence: How Often to Run Experiments
The ideal testing cadence depends on your traffic volume. Here is a practical framework:
High-Traffic Listings (500+ sessions/day)
Run continuous tests. As soon as one concludes, start the next. You have enough traffic to reach significance in 2-3 weeks for most elements. Aim for 12-18 tests per year per listing.
Medium-Traffic Listings (100-500 sessions/day)
Run 6-8 tests per year. Each test will take 4-6 weeks to reach significance. Focus exclusively on high-impact elements (main image, title, first bullet). Do not waste your limited testing capacity on low-impact elements.
Low-Traffic Listings (under 100 sessions/day)
Run 3-4 tests per year maximum. Each test may take 8-12 weeks. Only test elements with the highest potential impact (main image and title). For everything else, apply best practices from category research rather than testing on your own listing.
Seasonal Considerations
Avoid running tests during major shopping events (Prime Day, Black Friday, Christmas) unless your test is specifically about seasonal optimisation. Traffic patterns and buyer behaviour during these periods are fundamentally different from normal periods, and results will not generalise.
Also avoid running tests during the first two weeks of January (returns and browsing behaviour skew data) and during any period where you are running promotions or coupons that affect one variant differently than the other.
Prioritisation Framework: What to Test Next
Not all tests are created equal. Before you run any experiment, score it on three dimensions:
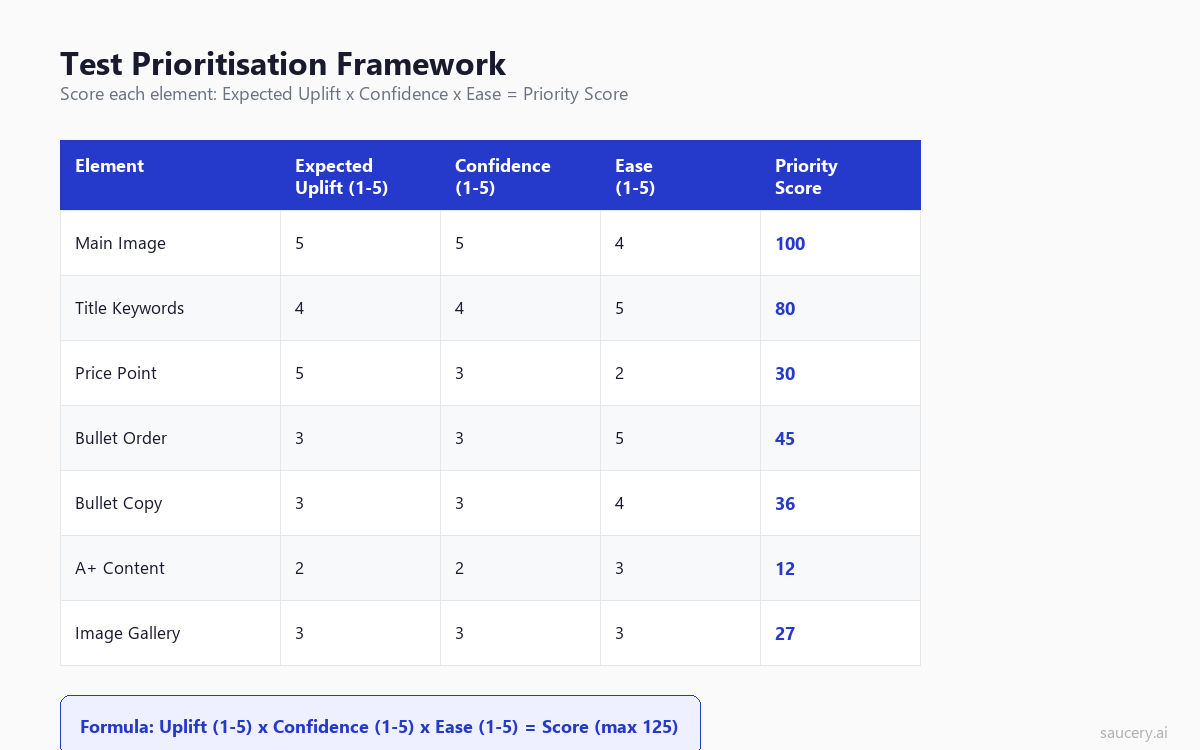
Expected Uplift (1-5)
How large is the potential improvement if this test wins? Score 5 for elements where you have seen or expect 15%+ conversion lift. Score 1 for elements where even a winning variant would produce under 3% lift.
Use the element hierarchy as your guide. Main image tests score 4-5 on expected uplift. A+ Content layout tests score 1-2.
Confidence (1-5)
How confident are you that the two variants are meaningfully different? Score 5 when you have clear evidence from competitor analysis or previous tests that this dimension matters. Score 1 when you are just guessing that a change might help.
Confidence comes from category research, competitor observation, and understanding what shoppers actually read on product listings. If you can articulate a clear hypothesis for why variant B should outperform variant A, your confidence score should be higher.
Ease of Implementation (1-5)
How easy is it to create the variant and run the test? Score 5 for text changes you can make yourself in minutes. Score 1 for tests requiring professional photography, graphic design, or complex A+ Content modules.
Multiply the three scores together. Test the highest-scoring elements first. A main image test scoring 5 x 4 x 3 = 60 should always come before a bullet formatting test scoring 2 x 2 x 5 = 20.
How to Interpret Results
Getting a result is only half the battle. Interpreting it correctly is the other half. Here are the pitfalls:
Statistical Significance vs Practical Significance
A result can be statistically significant (95% confidence that B beats A) but practically insignificant (B beats A by 0.3%). Before you implement a winning variant, ask: is this improvement large enough to matter? For most listings, a sub-2% improvement is within noise and may not persist.
Look for improvements of 5% or more relative. Anything less, consider whether it is worth the risk of the change not replicating.
The Winner’s Curse
Early results tend to overestimate the true effect size. If you end a test as soon as it reaches 95% confidence, the estimated improvement is likely inflated by 20-40%. This is a well-documented statistical phenomenon. Expect the actual improvement after implementation to be smaller than what the test reported.
Seasonal Confounds
If your test ran during a seasonal shift (summer to autumn, pre-holiday to post-holiday), the result may reflect seasonal buyer behaviour rather than your variant’s superiority. Look at whether the winning variant performed consistently across the test period or whether it pulled ahead during a specific week.
Revenue vs Conversion Rate
Amazon’s Manage Your Experiments reports conversion rate (unit session percentage) as the primary metric. But conversion rate alone does not tell the full story. If variant B converts 5% better but attracts sessions from lower-intent keywords, total revenue might not improve.
Always cross-reference test results with total revenue and total units sold during the test period. A variant that converts slightly worse but generates more revenue (by attracting higher-value sessions) can still be the better choice.
When Results Are Inconclusive
If after 8 weeks you still do not have statistical significance, that itself is information. It means the difference between your two variants is very small – probably under 3% relative. In this case, pick whichever variant you prefer for other reasons (brand consistency, future positioning, readability) and move on to testing something with higher potential impact.
Do not rerun inconclusive tests. If the difference was meaningful, you would have detected it. Use your testing capacity on something else.
Same product. Better listing. More sales.
Frequently Asked Questions
How long should I run an Amazon A/B test?
Minimum 4 weeks, ideally 6-8 weeks. Amazon’s Manage Your Experiments sets a minimum of 4 weeks, but most listings need 6-8 weeks to reach 95% statistical confidence. Higher-traffic listings (500+ sessions/day) can reach significance faster. Never end a test early just because one variant is ahead – early leads frequently reverse.
Can I run multiple A/B tests simultaneously on the same listing?
Amazon’s Manage Your Experiments tool only allows one test at a time per listing. This is intentional – it prevents confounding variables. You cannot test your title and your image simultaneously. Plan your testing calendar to sequence tests in order of priority.
Does A/B testing hurt my organic ranking?
Not directly. Amazon’s algorithm treats A/B tests as normal listing behaviour. However, if your B variant performs significantly worse than your A variant, the average conversion rate during the test period will be lower than normal. This can marginally affect ranking in competitive categories. The effect is small and temporary.
What is the minimum traffic needed to run meaningful tests?
Practically, you need at least 30-50 sessions per day to run meaningful tests within a reasonable timeframe (under 12 weeks). Below 30 sessions per day, most tests will time out before reaching significance. If your listing gets under 30 sessions daily, focus on driving traffic first (PPC, keyword optimisation) before investing in conversion optimisation through testing.
Should I test on my best-selling ASIN or my worst-selling one?
Test on your best sellers first, always. They have more traffic (faster results), and a 10% conversion improvement on a listing selling 50 units/day is worth far more than a 10% improvement on one selling 5 units/day. Optimise from the top of your catalogue down.
How do I test elements that Manage Your Experiments does not support?
Amazon’s tool supports title, main image, A+ Content, and bullet point testing. For elements it does not support (price, secondary images, video), you need to test manually: change the element, wait 2-4 weeks, compare metrics to the previous period. This is less rigorous but still valuable for high-impact elements. Use Business Reports data (unit session percentage, page views) as your comparison metrics.
What conversion rate improvement is “good” for an Amazon listing test?
Any improvement above 5% relative is a meaningful win. A 10-15% relative improvement is excellent. Above 20% is exceptional and usually only happens with main image changes. If you are consistently seeing results below 3%, you are likely testing elements that are too similar – make your variants more distinct.
Can I use the same testing approach for Walmart or other marketplaces?
The principles transfer but the tools differ. Walmart does not offer a native split testing tool. You would need to use manual before/after testing or third-party tools. The element hierarchy is broadly similar across marketplaces – images and titles matter most everywhere – but the specifics of what works vary by platform. What works on Amazon may not work on Walmart due to different shopper demographics and interface design.
How do I predict what will win before running a test?
Look at your top 3 competitors by unit sales in your subcategory. What are they doing that you are not? If the top 3 sellers all use infographic-style main images and you use plain white, that is your first test. Category leaders have usually already tested their way to their current configuration. Learn from their results, then test whether their approach works for your specific product. You can also predict how shoppers will respond to listing elements using modelled shopper research before committing to a live test.
Start Testing What Matters
The difference between sellers who optimise effectively and those who spin their wheels is not the number of tests they run. It is which tests they run. Start with your main image. Then your title. Then your first bullet. Ignore everything else until those three are optimised.
Use the prioritisation framework above to score your next 5 potential tests. Run the highest-scoring one first. Be patient enough to let it reach statistical significance. Implement the winner. Move to the next test.
That is the entire system. No complicated testing matrix. No 50-variable spreadsheet. Just: test the highest-impact element, wait for significance, implement, repeat.
Same product. Better listing. More sales.
About the Author: Andrew Mac is the founder of Saucery, where he helps e-commerce brands test product and listing decisions using modelled shopper research. Before Saucery, he spent 15 years in product development and consumer research for food, beverage, and FMCG brands across Australia, the UK, and the US.
Subscribe for F&B Consumer Insights
Data-driven insights on food & beverage consumer preferences, straight to your inbox.